Friday, February 24, 2012

Edible Delights

Today's post is a shout-out to a girl extremely talented in areas I can only dream of. :)
Have you ever seen anything so delicious in your life? My little sister makes the best sugar cookies on this planet. :) She even decorates them beautifully, as you can see! The other day she was making a clay cosmos flower, and it reminded me of her fabulous creations in icing, gum paste, and fondant. I definitely see a future in the pastry business, don't you? ;)

Love you, sis!
Alexis

Tuesday, February 21, 2012

Jacobian Pomegranate Take...3?

Hello Everyone!

I am crewel-working again, and this piece will be finished by State Fair Time this year! I am trying to decide if this piece should go into the UFOs, but I think, likely not. This piece is the reason I have UFOs in the first place. :)
Here are some recent snapshots. I am working vigorously to finish. It is actually much more pleasant to work with the wool during the winter. It doesn't stick to you as much. :)
From this photo you can actually see my different stitches!!! Thrill!

Short Story: Lexi's Playtime~A Photo Montage


This is my cat. She is rather adorable. (This picture kind of makes her look evil so I thought I had better say she is adorable...) She likes to play with her toy mice, and sometimes she will fetch them for me.

"I am so ready to play I even sat in the basket with all the toys!"

"Oh, right! You can't play with me if I am sitting on the toys! Here is a toy for you to throw for me. We can play now!"


"You know what? Just take them all. I think I will stay here and fall asleep sitting up."


I just love my cat, and this is only one (albeit funny) reason why! I hope you enjoyed!
Alexis

Monday, February 20, 2012

Lost and Found


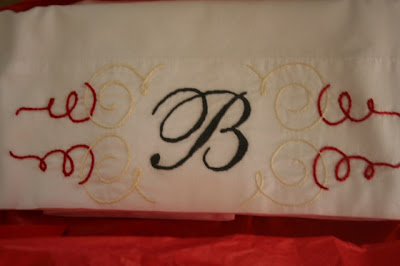
Today I was browsing through our old pictures and I found the pictures of this completed pillowcase! (I knew I had pictures of them somewhere!) This was a gift for a friend's wedding. Her house, based on her registry, was going to look "Old World Italian", and I found a simple font that seemed to compliment the decor. I added the swirls and voila! A simple but very lovely gift.

A close view of the "B" and my satin stitch.

A view of my stem stitch. Here you can see how the stitches intertwine. 

Little Lady Pillowcase~"Project UFO"

The "Little Lady" herself.
Because I LOVE embroidering I asked for things to embroider Christmas of 2010. I haven't exactly gotten to finish them yet, but now I will begin to do so! We now begin Project UFO (Un-Finished Objects)! The first project is a pillowcase with a sweet little ruffle on the bottom. The pattern is actually a southern belle and the ruffle is the bottom of her dress! I have the first color completed on the first pillowcase so far. This project mainly consists of stem stitch, lazy daisy stitch, and french knots, so it should be a fun and easy "tv project" I might work on it tonight. :) My next post on this UFO will (hopefully be a "how-to" on the three types of stitches; This project is a cute one for those of you just beginning, and I would love to help by passing on some tips!

The colors I have left to finish. You can see a small section of the periwinkle in the corner. :)


Valentine's Day: Spreading God's Love


The stack of cards. It kept growing!

This was a highlight of my month. My Junior Optimist Club decided to show God's love to the community by making Valentine's Day cards for the residents at two local nursing homes. I hosted a "valentine-making party" and the fun of creating beautiful designs began! We had oodles of supplies: embossing tools/glitter, stamps, fun paper, cards and envelopes, and of course, people to enjoy the time with!
Abi, decorating one of her cards. 
One of the lovely cards! I wish I had gotten pictures of more of them!
I was so excited as cards began stacking on our little bar area. Every single card was an expression of creativity and beauty! I loved the different designs the girls who came thought of. I wish I had more pictures so that I could praise their work in much more detail. :)
As a shout-out to them: Thank you again for coming! I relished the time we spent together preparing to share God's love with the residents of the nursing homes. When I delivered the notes (After I placed scripture verses inside) the smiles on their faces were so inspiring. I hope we can continue doing things like this for them!
Rachael, pasting paper. :)

Sparkling Adornments~Additional Pictures!

I found additional pictures of the jewelry I made and I am now posting them for your enjoyment! I thought this project was the most fun to create this Christmas, and I hope to continue making more jewelry in the near future!
These are the matching earrings I made for the gold necklace. It was my first time trying the double strand. I think it turned out quite lovely, don't you?

A close-up of the incredibly cool wire-covered beads.

A better view of the peacock pendant and dangling beads. :)

The whole set!

A close-up of the flower pendant and design of the beads.

Thursday, February 9, 2012

Ode To A Page A Year Filled

I must say, a lot has happened on this lovely blog in a year's time. I have teetered back and forth between crafts and books, so I must revise my previous statement in "Ode to a White Page" (see The Ode). I must give equally to both of my passions. :)

I thank all of you who have been with me through this time! I do hope you stay on with me on my crafty, thought-filled, bookish journey.

~Alexis~

Sparkling Adornments


I finally uploaded some pictures of the other two necklaces I made as gifts this Christmas. When I make jewelry I like to have some interesting, unique element to draw interest.

For the necklace with the whimsical peacock the interesting piece is the little beads with wire artfully wrapped around them. I spotted them in the store and instantly knew they would go perfectly with the pendant I picked out. That is one reason I cannot go shopping too often at craft stores. I will always find something that is "perfect for this!" or "perfect for that!" and I will spend WAY too much money. :)

When I made the gold necklace I was going for sophisticated, but stylish. I was browsing the beads to find gold tones and I found these super cute beads with wire "netting" around them. The beads themselves were not as nice as the others I found, but with the wire "netting" you can't hardly tell. :) I exuberantly went to the checkout counter after this outing, let me tell you!

More posts are imminent!
Alexis

Reflection on Seasons

Good Afternoon!
I am loving winter, but I miss summer wedding season! :) This is a design that I considered for a simple monogram pillowcase I was commissioned to make. I am not totally sure this is the design I ended up using, though, because I took this picture so long ago! Hopefully, I will be able to get a picture from my commissioner. Readers, make a point to take pictures of the gifts you give away! It is so nice to look back and see the work you have done-and then it can inspire you with new designs. :)
As I was saying, I love winter, and it has given me an opportunity to work on a small afghan and my crewel embroidery piece that I posted about previously (see Jacobian Pomegranate Take 2). I will definitely be posting pictures and posting soon about those projects!
Meanwhile, some tips for monogram design. I like to find a font that I like and then I customize it to fit the personality(ies) of the person(people) I am making it for. Sometimes this includes adding a special design around the outside of the monogram (flowers for a gardener, pink or blue designs for a baby girl or boy, etc. The sky is the limit!) and other times it is designing the letters myself. A helpful tip for finding the personality of your commissioner-their wedding/baby/etc. registry at a store! The registry will also give you guidelines on color and can often supply inspiration for designs. I really enjoy personalizing my monograms. :)
Hopefully I can get pictures of my craftiness up soon!
Alexis

Monday, February 6, 2012

Inheritance: A Excellent Ending or Fabulous Flop?

Dear Readers,

If you have not gotten the chance to read the Inheritance Cycle I would encourage you to read it. I love the way Paolini describes his country and lets us get to know his characters. Though the ending of the last book, Inheritance, seemed lackluster at first, I have decided that its simplicity compliments the intricacies of the previous books and appears to finally bring peace and easiness to Eragon's turbulent world. Overall, it is an excellent series that encourages honor, uprightness, and shows what makes a true hero-all things out young people should be reading about and implicating in their lives.

Have a Great Day!
Alexis

God's Wondrous Creation-In A Necklace

There is no doubt that God's creation is beautiful. Every new day its uniqueness increases, and it is virtually impossible to replicate-but we can try!

This necklace, a beauty made to replicate the fall leaf of a chrysanthemum, is a joy to create, and I appreciated how easy it was to make something that pretty.

To make the pendant of the necklace I used paper clay. In my mom's art class she introduced the technique of imprinting leaves to make an almost exact white carbon copy that would dry and you could paint. I chose the leaves of the chrysanthemum plant that grows in our back flowerbed because they had a lovely red color creeping up from the edges and I thought it would make an interesting necklace. Basically, you roll out the paper clay (which you can get at Michael's) to the thickness you would like your leaf to be. Mine was about a quarter inch thick. Then you carefully press the leaf into the clay and cut around the outline of the leaf with clay tools. (Your leaf should still be stuck in the clay) Now smooth the sides of your clay so that they match the sides of your leaf. Carefully peel the leaf off. This part is crucial. If your clay was too wet or too dry (Usually right out of the package and rolled a few times is perfect) the clay will rip or not have imprinted enough. I did three leaves so that I would be sure to have at least one nice one. Lastly, with a paperclip that is stretched out poke a decent sized hole into the clay if you would like it to be some sort of jewelry or ornament.

Let the clay dry. We shaped our leaves by laying them across foil that was bunched up and then let them bake awhile in the toaster oven.

The next step is coloring your leaf. You can make it any color you would like-it does not have to realistic. One of my mom's students had a blue leaf! We used watercolors on our leaves. Watercolors blend easily so they were ideal for showing the many colors and layers leaves have. Once the watercolors dry we put a clear varnish on the leaves so that they would last longer and be a little shiny.

Next is my favorite part-shopping! I went to Michaels for a toggle clasp-rose gold colored- and beads to match to my leaf. I felt that the red part of the leaf was key to making this necklace really neat so I picked up a few different beads in reddish tones and only a couple in green. I used all natural beads-stones-because my pendant was a natural looking and feeling element and I wanted to accentuate that.

Final step-stringing the necklace. I used beader's wire which is very flexible and is unlike normal wire in that it doesn't hold shape. That makes it excellent for a necklace. Since the leaf's hole was too far in from the edge to secure it to the necklace with a loop I did a slip knot with the beading wire and it gave it a rustic look. I used a crimping tool to secure the beads and a cutting tool to trim the excess.

Voila!~A finished necklace that is an excellent gift and a fun accessory!


"Try something new today"~Alexis

Friday, February 3, 2012

The Completed Beaded Clutch


The finished product!
After threading hundreds of tiny beads onto a paper thin needle I have completed my needlework project of the last few months. :) The beading techniques were so fun to learn, and I ended up using a pattern I already had to make a little clutch out of the beadwork I had done. I lined it with shiny gold fabric, and it looks fabulous!

Because the lining was easily frayed and slickery, I put a simple cotton fabric between it and the outside fabric to add extra support.


This was a really enjoyable project to do. I did have to use a small "TV" tray to keep the beads contained, but this project is easily done in front of your favorite television show or while listening to a book on tape.

The multiple layers of fabric, and shiny gold! 
My next project for my needlework class is a quilted table runner! I am so excited to learn how to quilt. I have been dying to buy those cute little fabric squares and I hope I am advanced enough by this summer to make a special quilt to match my college dorm next year! I have not taken any pictures yet, and we only have class once a month, so I will post about that exciting new project as soon as I can!

Have a fabulous day!
Alexis